Create a new group
As with joining groups, there is also no limit to the number of groups you can create on the Rehabilitation Community.
Whilst we encourage the formation of new groups, please bear in mind that by creating a group you are also committing to additional responsibilities including growing the group membership base, facilitating discussions and potentially moderating responses.
Check out the guide for group organisers to learn more about this important role before you decide to create a new group.
Creating a new group is easy and takes less than a few minutes. Before you begin, please search the existing groups to make sure there are none with the same name or discussion topic. To do this you can use the search box in the top right hand corner of the page.

When you are ready to create your group, take a moment to consider your group name and group description:
- Who is your group for? Is it for all rehabilitation professionals? Would you like all members of the community to consider joining your group? You can make the group membership as narrow or broad as you like depending on the purpose of your group.
- What is the purpose of your group? What kind of information, stories or resources would you like members to contribute?
- Why are you creating this group? Consider proposing an objective or goal, something that you would like to achieve as a group.
Once you have chosen a group name and description, you are ready to create a group! Go to the Groups page on the main menu of the Rehabilitation Community and click on ‘Create a Group’ on the groups menu bar.

You will be guided through the following steps:
- Details: enter your group name and description. Click ‘Create Group and Continue’.

- Settings: here you can choose to create a public or private group. You can also choose to create a hidden group that can only be joined by private invitation and is invisible to all other Rehabilitation Community Members. You will also be asked whether you would like to allow other members to invite new members to the group, which members are allowed to post in the feed, send messages and upload photos and documents. If you are creating a sub-group, ie. a group within a group, you can select the main group or ‘parent group’ from the dropdown menu.
- Forum: Choose if you would like to have a discussion forum for your group by clicking the check box. This will create a ‘Discussions’ section in the group page.
- Photo: Upload a group photo. Something that represents your group name or description.
- Cover Photo: Appears as a banner at the top of your group page. The minimum recommended image size is 1950 px x 450 px.
- Invites: Select which Rehabilitation Community members you would like to invite to join your group. This process is the same as inviting others to join a group.
Once you have completed all the steps, click ‘Finish’ at the bottom of the page on the right hand side. Other members will now be able to view your group on the groups page! You can start discussing straight away by posting in the activity feed, starting a new discussion and inviting more members to join your group.
Sub groups
Sub groups can be created as groups within an existing group. Sub groups are useful ways to gather members from an existing group to discuss a particular topic of interest in greater detail, or share resources and information around a certain topic area. Note that sub groups are not displayed on the groups page, and can only be found by accessing the main group or ‘parent group’ to which they belong.
The process for creating a sub group is the same as for creating a new group, except in the settings section you will need to select the ‘parent group’ from the drop-down menu.

Editing group details and changing group settings
As the group organiser, you can edit your group details and settings at any time. To do this open your group page and select ‘Manage’ to access all the settings as per the setup process. Note that only Group Organisers will be able to see the ‘Manage’ tab on their group page. Remember to click ‘Save changes’ for every section that you edit!


Inviting others to join a group
Once you are a member of a group, you can invite others to join the group as well. Note that only existing Rehabilitation Community members can be invited to join groups, if you wish to invite someone to join the Rehabilitation Community see more information about inviting others to join. Also worth noting is that some groups may not allow members to invite others to join – check the group settings with your group Organiser.
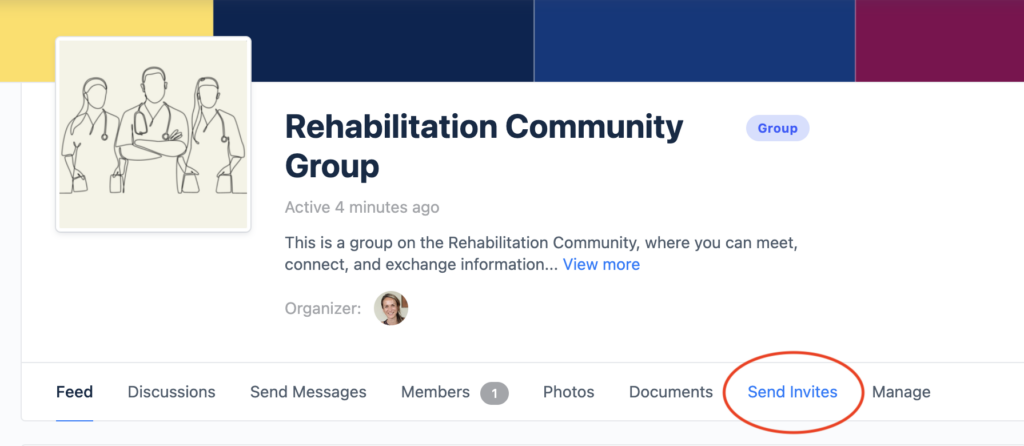
To invite Rehabilitation Community members to join a group, go to the group page and click ‘Send Invites’ on the groups header bar.
On the left hand side of the page, you can search the list of Rehabilitation Community members and click the + button next to their name to add them to the invitation. You can add as many members as you like to a single invitation.
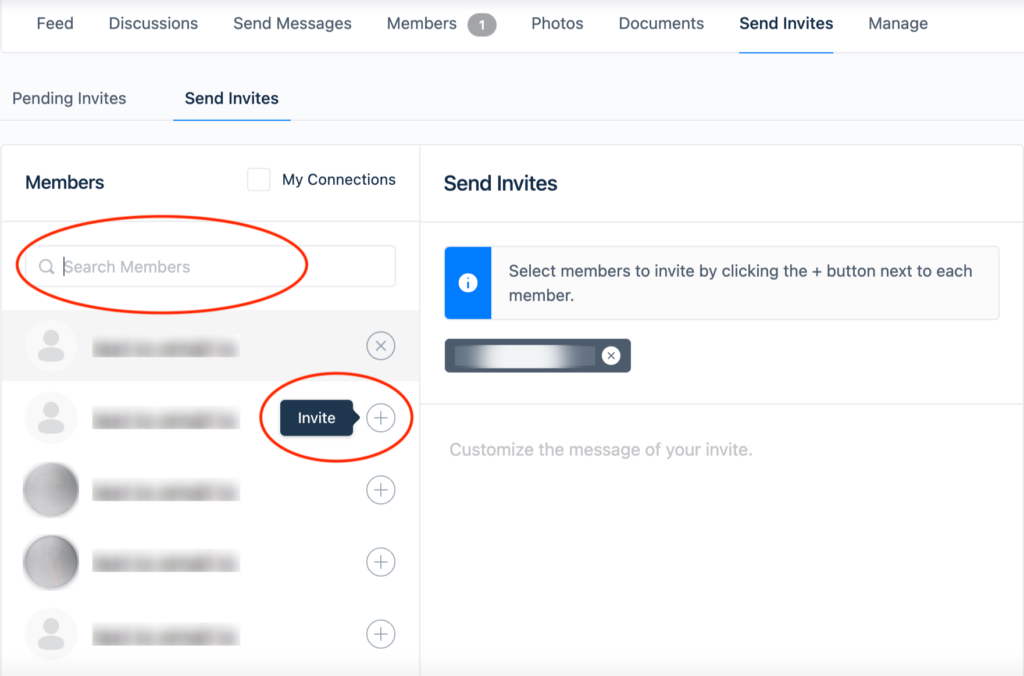
There is also the option to customise your invitation message, however due to the formatting of the email invitation, this message will not be clearly visible once received. In case you have any specific information or instructions to share about joining the group, it is best to send this via email or direct message.
Once you have added all the names of the members you wish to invite, you can send your invitation by clicking ‘Send’ on the bottom of the page.
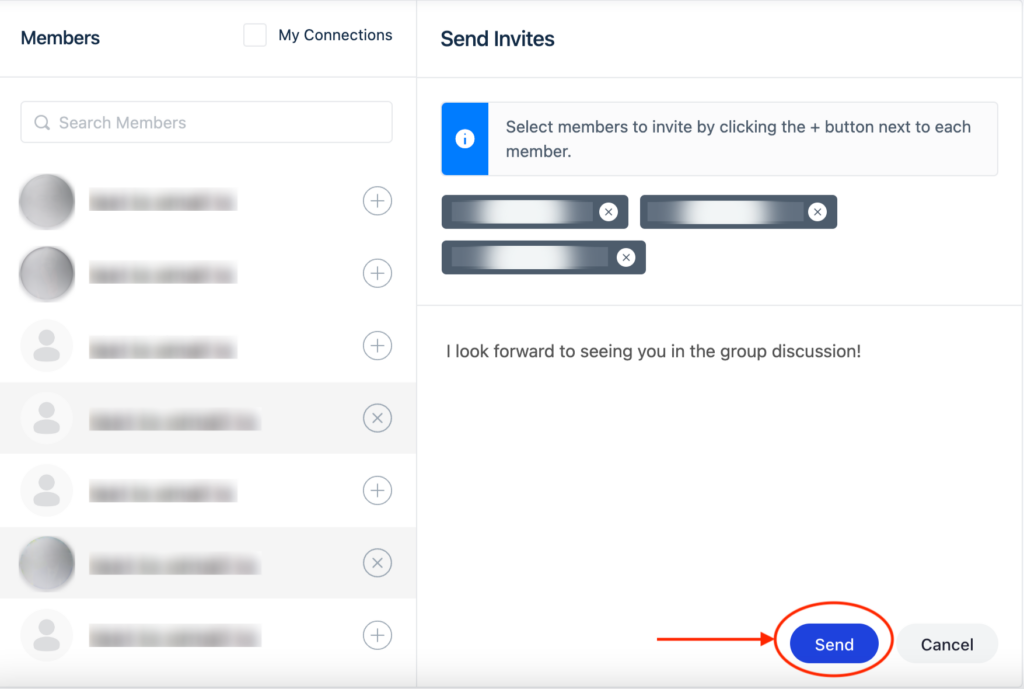
You can track how many invites have been accepted by going to the ‘Pending Invites’ tab, to the left of ‘Send Invites’.
